WordPress Tutorial
Writing Posts
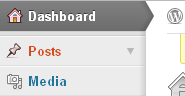
Enter the WordPress Admin Panel and Click the Post tab.
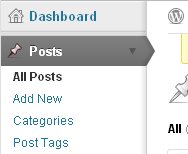
This will open up a list of option within the Post section. To write a new Blog Post click on the Add New link.
If you wish to write a Page instead of a Post, select the Page tab.
Writing Your Post
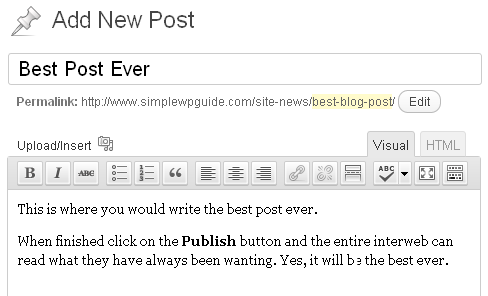
Give the Post a descriptive Title.
This will appear at the top of your Post and will become the linked text that links to this Post in other pages.
It also becomes the default file name for the Post unless you use the Permalink editing feature just below the title box to specify a specific, perhaps shorter, file-name in the URL path.
![]()
- You would use the Permalink Editor to give the URL file-name a shorter version than the title of the Post.
- If your Post is titled “This is the Best Blog Post Ever” the default URL to that page would be something like www.domain.com/this-is-the-best-blog-post-ever/ which is rather long. By editing the permalink name you could enter “best blog post” and the URL would then become www.domain.com/best-blog-post/
- Write your content into the Text Editor area. Use the graphic editing icons to format your text.
- Note: If you previously wrote your text using a word processor, like Microsoft Word, you will transfer lots of formatting when copying and pasting the text from Word into your WordPress editor. It will produce much unnecessary code (click on html view to see what we mean) which may possibly screw up the formatting of your website. To avoid this, first paste your text into a simple text editor like Notepad (all Microsoft operating systems include the Notepad program). This will strip all the formatting from Word into pure text. Then copy and paste from Notepad into WordPress. You may now want to add some formatting, such as bold sections, headlines or bullets, as you would like to see it displayed on your website.
- There is a button in the Text Editor for pasting text from MS Word, but it is fickle and does not re-format everything. Our recommendation is that you simply turn it into plain text then reformat it to cleaner HTML code with the WP Editor buttons.
- If you have any concerns with this, please do call us on 01326 567150 and we can talk you through it.
Post Options
Below the Text Editor and on the right Sidebar are a number of features and advanced options for your Posts. Here you assign things like Categories, Tags, Allow or Disallow Comments, etc... We highlight the main ones you are likely to use by adding a screenshot image of that feature.
Attach your post to a Category
- You can add new Categories here on the fly using the Add New Category link at the bottom of that box. Categories can be also managed from the Categories link under the Post tab. If you neglect to assign the Post to a Category it will be assigned to your default Category.
- Categories are important so be sure to select the correct one before publishing your Post.
- Try to avoid publishing then changing your Category and re-publishing. Search engines index new WP Posts very fast, sometimes within minutes. You don’t want them to index the Post at one URL only to republish it again under another URL because you changed a Category. The old URL would then throw a “page not found” error to the search engine the next time they go to crawl it.

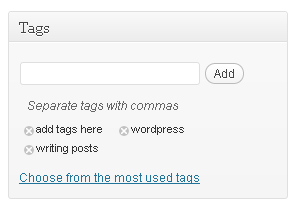
Assign Tags to your post
- Tags are another form of categorisation of your Posts, sometimes also known as Keywords.
- If your WP theme displays Tags then you may wish to use Keywords related to the Post in the Tags box.
- Separate Tags by commas.
Save and publish your posts
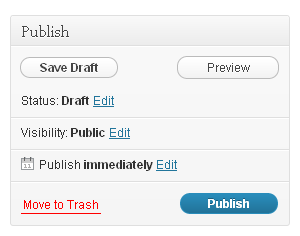
- As you write your Posts, WordPress will begin to autosave your Post as a draft. Use the Save or Publish buttons when you are ready.
- Before publishing the Post you can first use the Preview button to see how it will look. Right click on the Preview button then open it in a new window or new tab so you can easily jump back to the Write Post page.
- When you click the Publish button you will be redirected to a new Write Post page.
- The little Calendar option just below the Save and above the Publish buttons will allow you to post-date your Blog Posts, which may be useful if you want to write a batch of them to be published at intervals. They will remain unpublished until they go live on the site at your pre-set date and time. Click the Edit link and those options will appear for you.
- Your drafts will not be published on the website until you select the Publish button. To Edit draft Posts you’ve not yet completed or published, click on the Posts tab. Here you will find the full list of all your Posts. It will indicate which are published and which un-published. You can click the Title link of your draft Post to continue editing and then publish it.