WordPress Tutorial - Adding Images and Other Media
Adding Images and Other Media
Adding Images is relatively easy using the Image Upload feature in the Post or Page editor.
Be sure to read the “Note on Image Sizes” on the bottom of the next page. It’s quite important.
Adding Images to Posts Pages
- First have your cursor set at the spot in your Post or Page where you want the Image to appear. Follow the steps below to paste the Image code at that spot in your Editor.
- Should you want to move the Image to another location within the body of your text, it is easiest to switch to HTML view, find the portion of code for that Image, copy, cut and paste it to the new location inside the text while in HTML view.
-
Uploading Image Files to the Server
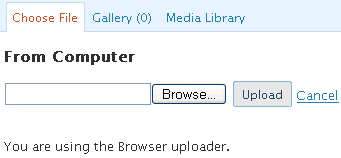
- Click the Add an Image icon in the Add Media section above the Editor buttons.

Then find your Image file on your computer and hit the Upload button.
The folder on your web server in which WordPress will be placing the Image files must have its File Permissions set to allow remote uploads.
If you get errors here saying the file could not be moved to the folder, ask your web designer or whoever set up WordPress for you, to change those file permissions.
Position images in your content
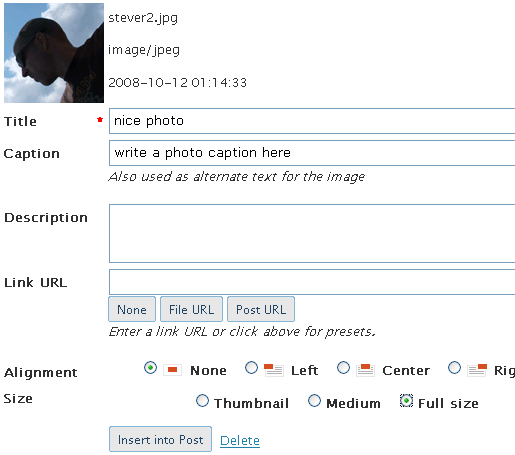
Next you will be presented with a number of options before placing the Image in your Post.
- Give the Image a Title. By default it will use the file name, you can change it. You may add a Caption which will appear below the Image. You may also add a Description if you wish, but it is not really needed.
- You can also choose to have the Image link to something. This can be very handy if you want to upload a large Image. You can have a smaller sized Image inside your Post but have it link to a larger version you’ve already uploaded to the server. Visitors can then click the link to view a full sized Image without breaking the layout of your site.
- You can set the alignment of the Image and whether or not to have the text wrap around it.
- You may also set some size constraints here too. When you upload an Image using the Image Uploader in WordPress it also creates a small thumbnail file of the Image. So you may choose to display just the thumbnail in the Post and have it link to the normal image, a medium-sized version or the full-sized file.
- Now click the “Insert Into Post” button.
A note on image sizes
Images on your computer are sized in pixels. The amount of space you have to place an Image inside a Post or Page is limited to the width (in pixels) that is allowed by the content area of your WordPress theme. If the size of your Image extends beyond the width of the content area it can mess up the layout of your site and possibly force your sidebar down to the bottom of the page.
Typically, many WordPress themes are designed to be around 800 pixels (px) wide (the width of a 15” monitor). However, now that more internet users are using 17” monitors or larger, some WordPress theme designs are going wider than just 800px. Your sidebar may take up 200-300 pixels and there may be some padding around your content area, leaving you with an effective width of 500-600 pixels to work with.
Find out from your designer the maximum Image width you have to work with. Images larger than that should get re-sized with whatever Image editing software you have on your computer. Simply open the Image file in the editor, crop the Image to your desired viewpoint, and then reset the Image dimensions. Now re-save the Image. If you want to keep the original Image in its full size, think about saving the resized version with a new file name.