WordPress Tutorial

This guide is intended to be a simple guide to using WordPress (WP) for those new to managing a WP powered site. It covers the common tasks of writing and managing content and basic site maintenance. It does not cover how to customise WordPress or any advanced coding, which will need to be done by a Web Developer.
WordPress is a pre-built Content Management System (CMS) so there is already a lot of help information out there on the web. However, after installing WordPress onto websites for clients we quickly realised that there is a bit of a learning curve for those new to running a website. Often, these are small business owners who need the ability to update their own website but have no technical web skills, or new bloggers who struggle with using the handy but sometimes overwhelmingly extensive user manual available on the WordPress website.
We plan to keep this WordPress User Guide as simple as we can. There is no need to re-invent the wheel as the WordPress Codex (The online WordPress User Manual) covers all the advanced stuff very well, but we understand that it can be difficult to know where to start. This document aims to cover the basics of writing and managing text content, and adding and formatting images.
Login to WordPress

To login to WordPress, go to www.yourdomain.co.uk/wp-login.php and enter your login details.
Dashboard and Basic Settings
You will be taken to the website’s ‘Dashboard’
- Dashboard - Basic Settings
Before begin to create your Blog and/or Posts, ensure you are happy with the Settings.
- General Settings: Select your tagline and time zone enables you to add a brief but relevant site description, alongside your geographic location.
- Privacy Settings: This allows you to select your site’s visibility to search engines and users.
- Discussion Settings: This is where you can turn comments on or off, which puts you in control of who you will allow to contribute comments to your Blog. You can also block people, websites and spammers in this section.
- Finally, Fill in your Profile enables you to add a little more information about yourself or your business, including website and email details, should you wish to allow visitors to your site to contact you.

Writing Posts
Enter the WordPress Admin Panel and Click the Post tab.
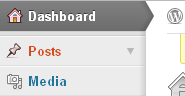
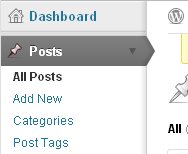
This will open up a list of option within the Post section. To write a new Blog Post click on the Add New link.
If you wish to write a Page instead of a Post, select the Page tab.
Writing Your Post
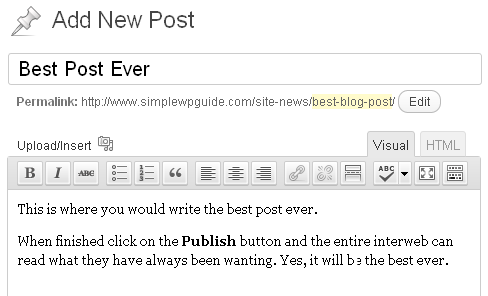
Give the Post a descriptive Title.
This will appear at the top of your Post and will become the linked text that links to this Post in other pages.
It also becomes the default file name for the Post unless you use the Permalink editing feature just below the title box to specify a specific, perhaps shorter, file-name in the URL path.
![]()
- You would use the Permalink Editor to give the URL file-name a shorter version than the title of the Post.
- If your Post is titled “This is the Best Blog Post Ever” the default URL to that page would be something like www.domain.com/this-is-the-best-blog-post-ever/ which is rather long. By editing the permalink name you could enter “best blog post” and the URL would then become www.domain.com/best-blog-post/
- Write your content into the Text Editor area. Use the graphic editing icons to format your text.
- Note: If you previously wrote your text using a word processor, like Microsoft Word, you will transfer lots of formatting when copying and pasting the text from Word into your WordPress editor. It will produce much unnecessary code (click on html view to see what we mean) which may possibly screw up the formatting of your website. To avoid this, first paste your text into a simple text editor like Notepad (all Microsoft operating systems include the Notepad program). This will strip all the formatting from Word into pure text. Then copy and paste from Notepad into WordPress. You may now want to add some formatting, such as bold sections, headlines or bullets, as you would like to see it displayed on your website.
- There is a button in the Text Editor for pasting text from MS Word, but it is fickle and does not re-format everything. Our recommendation is that you simply turn it into plain text then reformat it to cleaner HTML code with the WP Editor buttons.
- If you have any concerns with this, please do call us on 01326 567150 and we can talk you through it.
Post Options
Below the Text Editor and on the right Sidebar are a number of features and advanced options for your Posts. Here you assign things like Categories, Tags, Allow or Disallow Comments, etc... We highlight the main ones you are likely to use by adding a screenshot image of that feature.
Attach your post to a Category
- You can add new Categories here on the fly using the Add New Category link at the bottom of that box. Categories can be also managed from the Categories link under the Post tab. If you neglect to assign the Post to a Category it will be assigned to your default Category.
- Categories are important so be sure to select the correct one before publishing your Post.
- Try to avoid publishing then changing your Category and re-publishing. Search engines index new WP Posts very fast, sometimes within minutes. You don’t want them to index the Post at one URL only to republish it again under another URL because you changed a Category. The old URL would then throw a “page not found” error to the search engine the next time they go to crawl it.

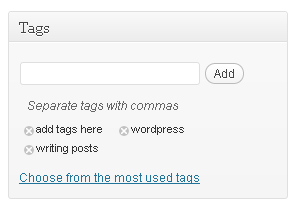
Assign Tags to your post
- Tags are another form of categorisation of your Posts, sometimes also known as Keywords.
- If your WP theme displays Tags then you may wish to use Keywords related to the Post in the Tags box.
- Separate Tags by commas.
Save and publish your posts

- As you write your Posts, WordPress will begin to autosave your Post as a draft. Use the Save or Publish buttons when you are ready.
- Before publishing the Post you can first use the Preview button to see how it will look. Right click on the Preview button then open it in a new window or new tab so you can easily jump back to the Write Post page.
- When you click the Publish button you will be redirected to a new Write Post page.
- The little Calendar option just below the Save and above the Publish buttons will allow you to post-date your Blog Posts, which may be useful if you want to write a batch of them to be published at intervals. They will remain unpublished until they go live on the site at your pre-set date and time. Click the Edit link and those options will appear for you.
- Your drafts will not be published on the website until you select the Publish button. To Edit draft Posts you’ve not yet completed or published, click on the Posts tab. Here you will find the full list of all your Posts. It will indicate which are published and which un-published. You can click the Title link of your draft Post to continue editing and then publish it.
Writing Pages
- Pages differ from Blog Posts in that they remain static and outside the flow of chronologically organised posts.
- Pages often form the main navigation to sections of your site which tend not to change. For example, they can be as basic as an About Us or a Contact Page or even a whole series of articles and sub-pages that reside away from higher order pages within your site’s navigation structure.
- Writing a Page in the WordPress editor is similar to writing a Post.
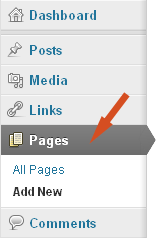
- After clicking the Page tab (see image to the right) click on the Add New link to begin writing a new Page, or the All Pages link to view and manage your current list of Pages.
Create your Page content inside the text editor, using the graphic editing icons to format your text.
For more on formatting text please see page 9. Again, like writing a Post, give your Page a Title, then write your page content in the main Text Editor box (see image below).
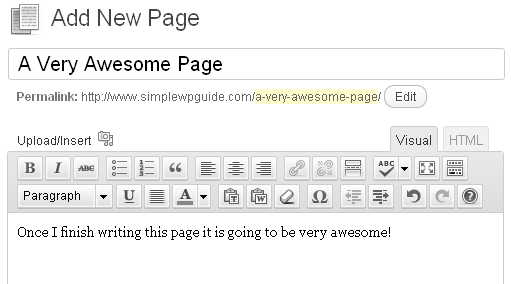
Your Title will appear at the top of your published Page as the headline.
It also becomes the default file name for the page URL unless you use the Permalink Editing feature just below the title box to specify a specific, perhaps shorter, file-name in the URL path.
![]()
You could use the Permalink Editor to create a shorter version of the URL file-name, should the original title be too long and wordy.
You can also use it to cover different variations on your Keywords for that page.
This can help with your search engine optimisation.
Page Options
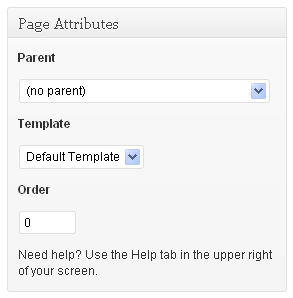
- To the right of the Text Editor, below the Publishing section, there are a number of options. Some of the options differ from the Post options, some are the same. Below, we have highlighted the main ones you are most likely to use by including a screenshot image of that feature.
- Page Parent – select from current list of Pages where this Page should lie in relation to others. This sets the hierarchy of Pages and sub-Pages within the navigation structure of your website (this is only visible where multiple pages exist).
- Page Template – your Theme is likely to have a different template for Pages than it does for Blog Posts. It may also have multiple Page Templates to choose from. Select the desired Page Template here.
- Page Order – If your site includes a page that lists all the pages within your site (ie a Table of Contents), or there is a menu of Pages in the Sidebar, this is where you can set the order in which they are displayed. The default is that they are sorted alphabetically.
There are more options again below the Text Editor.
Save and publish your pages
As you write your Pages, WordPress will begin to autosave your Page as a draft. Use the Save or Publish buttons when you are ready.

- Before publishing the Page, you can use the Preview button to see how it will look first. Right click on the Preview button then open it in a new window or new tab so you can easily jump back to the original Page.
- When you click the Publish button the new Page will go live and you will then be redirected to a new Write Page page.
- The little Calendar option will allow you to post-date your Page for later publication onto the site. Posts will remain unpublished and then go live on the site at your pre-set date and time. Click the Edit link and these options will appear for you. This feature is typically more useful for Blog Posts than it is for static Pages.
- Your drafts will not be published live onto the website until you select the Publish button. To edit the draft pages you haven’t completed and published, click on the All Pages link. This is where you will find the full list of every Page you have created. It will indicate which are published and which are un-published. Click the Title link of your draft page to go to the edit screen and continue writing and then publish it.
Formatting Content
Built in formatting options
When writing a Post or a Page in the text editor, simply type in your text. The basic paragraph formatting will create itself automatically as you hit the enter key at the end of each paragraph.
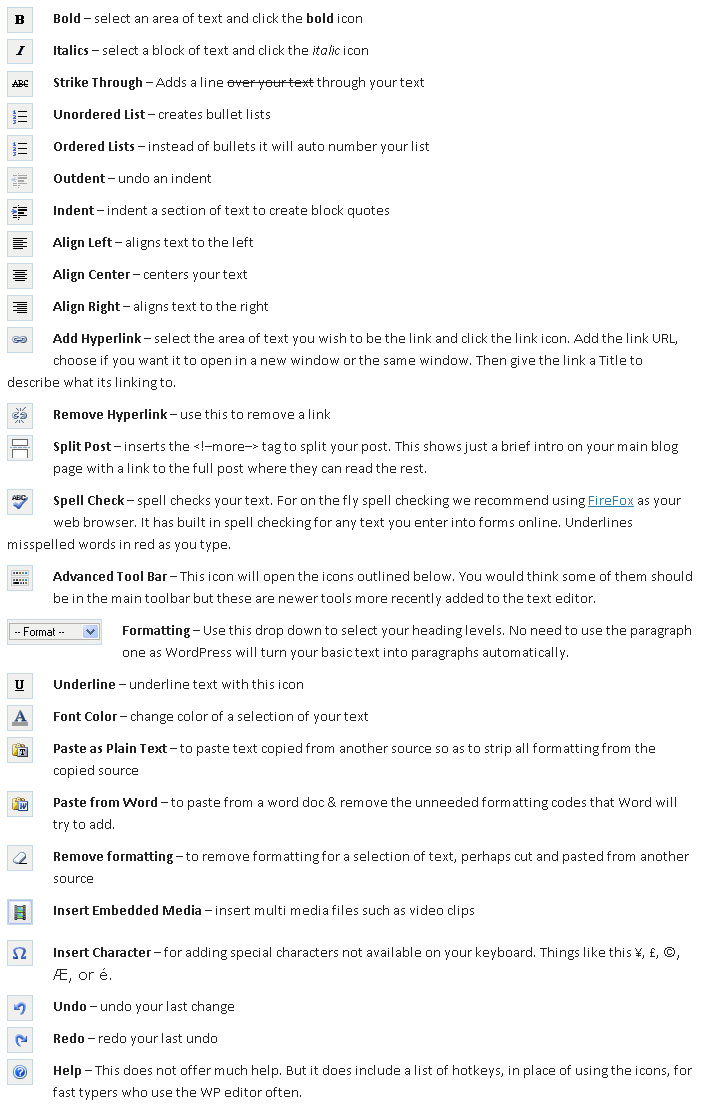
For additional formatting of your text, use the graphic editing icons at the top of the Text Editor (as seen in the image below).

These icons cover many of the basic formatting functions you are most likely to use. More functions are available by clicking the advanced toolbar icon on the far right, also known as the kitchen sink. You can see this icon where the arrow is pointing in the image below.

Using the Editing Icons
For most of these icons, to apply the formatting you select your block of text (click and drag with your mouse), then click on the appropriate icon.
Other tools, such as Upload/Insert Images, (above the main editing icons) require you to click on the area of the content where you wish to place the image, then click the icon and enter the information in the pop-up.
It is fairly straightforward, much like using any word processor.
Below, we summarise each Icon.
The Editor Icons
Hand-coded formatting
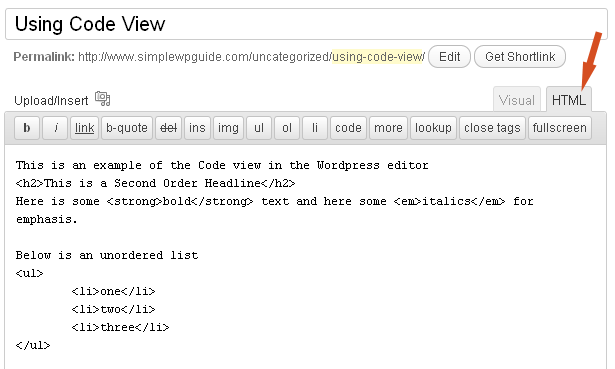
Should you need to use any HTML (Hyper Text Mark-up Language) coding not covered by the visual editor button you can use the Code view to hand code your Page (see arrow in image below).
This will require some basic knowledge of HTML tags.
Again, do call us if you are trying to carry out some specific editing and the HTML coding is unclear to you.
If you plan to do quite a bit of blogging with your WordPress system, you may want to learn a little HTML so you can have more control over what you are publishing in your posts.
The basics are actually quite simple and easy to learn. By switching back and forth between Visual and HTML views you can get a hang of some of the basics as you go.
Please note that the HTML view does not display paragraph Tags at the beginning and ends of your paragraphs. Instead it insets them dynamically into your Posts as they then get rendered within the browser.
Adding Images and Other Media
Adding Images is relatively easy using the Image Upload feature in the Post or Page editor.
Be sure to read the “Note on Image Sizes” on the bottom of the next page. It’s quite important.
Adding Images to Posts Pages
- First have your cursor set at the spot in your Post or Page where you want the Image to appear. Follow the steps below to paste the Image code at that spot in your Editor.
- Should you want to move the Image to another location within the body of your text, it is easiest to switch to HTML view, find the portion of code for that Image, copy, cut and paste it to the new location inside the text while in HTML view.
-
Uploading Image Files to the Server
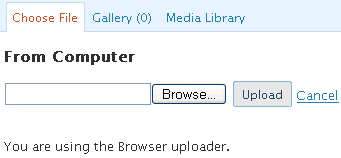
- Click the Add an Image icon in the Add Media section above the Editor buttons.

Then find your Image file on your computer and hit the Upload button.
The folder on your web server in which WordPress will be placing the Image files must have its File Permissions set to allow remote uploads.
If you get errors here saying the file could not be moved to the folder, ask your web designer or whoever set up WordPress for you, to change those file permissions.
Position images in your content
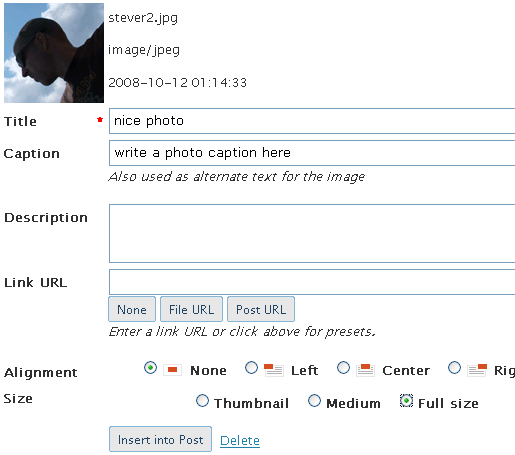
Next you will be presented with a number of options before placing the Image in your Post.
- Give the Image a Title. By default it will use the file name, you can change it. You may add a Caption which will appear below the Image. You may also add a Description if you wish, but it is not really needed.
- You can also choose to have the Image link to something. This can be very handy if you want to upload a large Image. You can have a smaller sized Image inside your Post but have it link to a larger version you’ve already uploaded to the server. Visitors can then click the link to view a full sized Image without breaking the layout of your site.
- You can set the alignment of the Image and whether or not to have the text wrap around it.
- You may also set some size constraints here too. When you upload an Image using the Image Uploader in WordPress it also creates a small thumbnail file of the Image. So you may choose to display just the thumbnail in the Post and have it link to the normal image, a medium-sized version or the full-sized file.
- Now click the “Insert Into Post” button.
A note on image sizes
Images on your computer are sized in pixels. The amount of space you have to place an Image inside a Post or Page is limited to the width (in pixels) that is allowed by the content area of your WordPress theme. If the size of your Image extends beyond the width of the content area it can mess up the layout of your site and possibly force your sidebar down to the bottom of the page.
Typically, many WordPress themes are designed to be around 800 pixels (px) wide (the width of a 15” monitor). However, now that more internet users are using 17” monitors or larger, some WordPress theme designs are going wider than just 800px. Your sidebar may take up 200-300 pixels and there may be some padding around your content area, leaving you with an effective width of 500-600 pixels to work with.
Find out from your designer the maximum Image width you have to work with. Images larger than that should get re-sized with whatever Image editing software you have on your computer. Simply open the Image file in the editor, crop the Image to your desired viewpoint, and then reset the Image dimensions. Now re-save the Image. If you want to keep the original Image in its full size, think about saving the resized version with a new file name.
Further Support
Extensive Help information is available from the official WordPress support website, which can be found at:
http://codex.wordpress.org/Main_Page
There is also a handy forum which you may wish to join to ask for further help.
As always, if you have any questions or problems, don’t hesitate to give us a call on 01326 375294 or contact us via our website at http://www.channelcomputing.co.uk/
Document Usage and Copyright
Sections of this guide were originally written by Simple WP Guide and more up to date versions are available online at www.simplewpguide.com.
The logos, companies and content presented in this document are copyright and/or trademarks of their respective owners.
Reproduction of document in any means is forbidden without our permission.
Contact
If you have any problems or questions, please contact:
Peter Graves, Channel Digital Limited, Phone: 01326 567150.
Email: This email address is being protected from spambots. You need JavaScript enabled to view it.">'+addy_text57217+'<\/a>'; //--> This email address is being protected from spambots. You need JavaScript enabled to view it.">, Web: www.channeldigital.co.uk